Early May brought a grab bag of emotions to the office- someone who had been a huge face of the company for over a decade was leaving, and one of my nearest and dearest co-workers was celebrating a birthday. In one week there were enough mixed emotions to fill a 90’s boy band song- some bitter sweet, some celebratory. And what do I do when I don’t know how to deal with my own emotions? Like the well adjusted almost adult I pretend to be, I turn to food and bake my feelings.
I decided to focus on my co-worker’s birthday as it was the most happy event to celebrate. I had found a fluffy, ruffley, swirly, twirly buttercream technique I really wanted to try and figured this would be a great opportunity.
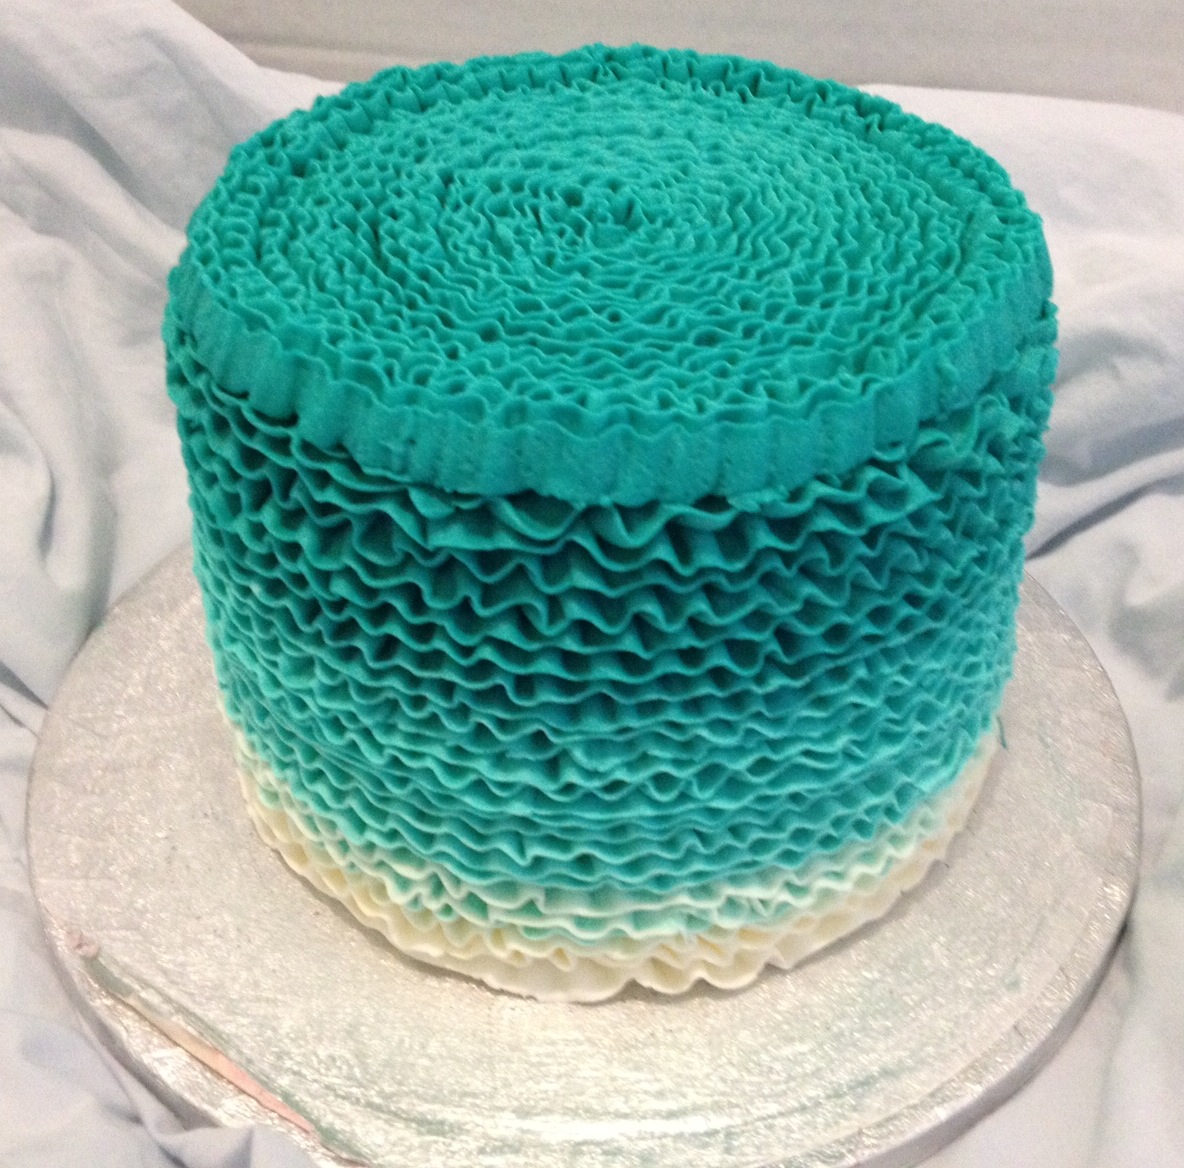
Now, before I go any further, let’s take a minute to talk about this hombre situation that is all over the place right now. I’ve toyed with trying it in my hair but I’m always jumping on the trendy train right when it’s leaving the station, so I knew as soon as I did the dyed deed, it wouldn’t be “in” anymore and monotone tresses would once again be all the rage. So I decided to live vicariously through my cake (did I mention how well adjusted I am?) and applied it there instead. The results are below.

I made a basic yellow cake but bumped it up a notch and soaked each layer in a simple syrup to keep it moist and sweet. I baked two layers and sliced them both in half because I like me the look of a nice tall cake. But after I sliced and diced, I took the simple syrup (recipe below), took a paint brush and literally painted the syrup on the entire surface area of each cake layer. The cake soaks it all up like a sponge, resulting in sweet, soft, saturated goodness (I Googled a synonym for “moist” since I already used that word and “saturated” is what I got- it was either that or my “humid” cake, so my apologies for that one.)
Simple Syrup Recipe
1 cup water
1 cup sugar
In a medium saucepan combine sugar and water. Bring to a boil, stirring, until sugar has dissolved. Allow to cool.
*Note- you could make a flavor for the simple syrup if you want, just sub out some of the water for the flavoring. For example, if you wanted to make a coffee flavored syrup, boil 1 cup sugar with 1/2 cup water, then remove from heat, add 1/2 cup coffee and allow it to cool. ALWAYS add the extra flavoring after you’ve boiled the sugar and water and removed from heat, not while it’s boiling on the stove.
After layering the cake with my basic buttercream icing and doing the all-too-necessary crumb layer, I was ready to get my ruffle on. Since I wanted the hombre look, I started with white icing at the bottom of the cake. Using a Wilton rose tip #104 with my pastry bag, I placed the wider end of the rose tip (tip is at a horizontal angle) lightly against the cake. This is where some contortionist movements came into effect. Simultaneously while moving the pastry bag ever so delicately in small up and down motions along the edge of the cake, I took my other hand and turned the cake on my turn table to keep the ruffle going in one smooth, consistent motion. (Even if you end up breaking the stripe of icing, it’s easy to continue it going by taking the pastry bag and picking up right where you left off to keep the stripe going all the way around. No one will be able to tell, I promise).
After doing a couple of stripes in white (you can keep them as close together or spread apart as you want but I like trying to layer them on as close as possible), I added one drop of turquoise coloring to my icing and did a few more layers. I lathered, rinsed, and repeated my way through the entire sides of the cake- adding a few more drops of turquoise coloring after doing 3-5 stripes until I got to the top with a very dark turquoise color.


I kept that dark turquoise color as the icing for the top of my cake. For the top, I changed the angle of my rose tip so that it was vertical and the wider tip was touching the cake. Then, starting in the very center of my cake, I did a very small ruffley circle that ended up so small it was maybe 2-3 ruffles, tops. It’s harder when you first start out doing circles that small, but as you work your way around the cake stripe by stripe and the circumference of your ruffle circle gets larger, it gets easier. Keep adding ruffley rows until you can’t add any more- seriously, my last layer was holding on for dear life trying not to fall off the edge of the cake, but it hung in there like a champ.

Final glamour shot! Now go forth and ruffle.